Hey everyone, welcome to my recipe page, If you're looking for new recipes to try this weekend, look no further! We provide you only the best Bread (Sourdough) Starter recipe here. We also have wide variety of recipes to try.
Before you jump to Bread (Sourdough) Starter recipe, you may want to read this short interesting healthy tips about {Easy Ways to Get Healthy. Becoming A Healthy Eater
Camp cooking can be as elaborate or simple as you want it to be. If you want to prepare quick and simple but healthy meals while you are swimming, camp cooking does not even need to require a fire. But if you are thinking about ridding your camping excursion having a feast, then camp cooking can make it possible for you to earn hot, healthy foods that are as good as you can make them at home in your own kitchen.
Almost any cooking process you are using from the kitchen can be replicated around the home. For instance, use a toaster or pit cooking to bake your meals. You might also easily fry foods in a bowl over a grill, or boil, braise and beverage. Which type of camping cookware is best for you? Camp cooking and clean-up can be easy or a hassle, it all starts with great camping equipment.
Some pots/pans arrive in sets that partner collectively or"nest" for storage and also allow you to tuck a canister of fuel inside them. This really comes in handy when you’re wanting to save space whilst camping.
Following are some camping items to consider with you if you are thinking about preparing some meals around the campfire. These common kitchen items allow you to replicate yummy meals when you’re out of doors.
• Other your favourite herbs and spices • Cooking oil • Pot holder
• Aluminum foil • Tongs and spatula • Cutting knives • Cutting board • Mixing bowl
If you have only a couple of campers and are looking for some simple camp cooking, try out the easy and quick technique of tin can cooking. All you will need is a fresh tin can – a 1 gallon size may works well. Your source of warmth can be a little campfire, or if wood burning is illegal, a small buddy burner will work well, which may be found at sporting good stores or online. Put your meal from the tin could and simply warm the contents of your own can over a flame. This technique works great for sauces, beans and poultry.
A more time-consuming camp cooking technique which also produces yummy food is pit cooking. Pit cooking is excellent for items which may be wrapped in aluminum foil to be cooked. It’s also a excellent camp cooking method if you are using a dutch oven or cast iron cookware. Pit cooking warms your food by heating stones and coals which are concealed in the floor. As the stones cool off, their emitted heat cooks the food. To pit cook, first dig a hole that is approximately three times bigger than your cookware. Line the pit with stones and create a fire in the center. When the flame has burnt rapidly for approximately an hourpush the warm coals and stones into the center. Layer your wrapped meals or covered skillets on top of the stones and coals and place more on top. After a number of hours, you will have some tasty camp food to relish.
We hope you got benefit from reading it, now let’s go back to bread (sourdough) starter recipe. You can cook bread (sourdough) starter using 11 ingredients and 11 steps. Here is how you cook it.
The ingredients needed to cook Bread (Sourdough) Starter:
- Get ◆Sponge 1
- Prepare 50 grams Starter liquid
- Take 50 grams Bread flour
- Take ◆Sponge 2
- Prepare 1 the whole amount Sponge 1
- You need 50 grams Starter liquid
- Provide 50 grams Bread flour
- Get ◆Sponge 3
- Get 1 the whole amount Sponge 2
- Use 50 grams Starter liquid
- Prepare 50 grams Bread flour
Steps to make Bread (Sourdough) Starter:
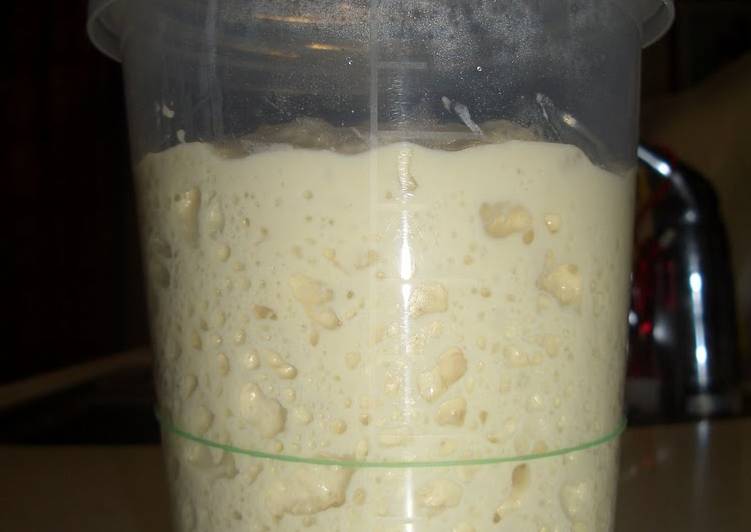
- Day 1: Make Sponge 1 by combining the starter liquid and flour. Mix together lightly, and mark the liquid level with a rubber band. The liquid can be a bit floury.
- Leave in a warm place for 8 to 12 hours to ferment.
- When the sponge has doubled in volume and there are air bubbles in the bottom, it's done. Rest for 12 hours in the refrigerator.
- Day 2: Add the entire amount of Sponge 1 that was made in Step 3 with the Sponge 2 starter liquid and flour, mix lightly, and mark the liquid level with a rubber band.
- Leave in a warm place for 8 to 12 hours to ferment.
- When the sponge has doubled in volume and there are air bubbles in the bottom, it's done. Rest for 12 hours in the refrigerator.
- Day 3: Add the entire amount of Sponge 2 that was made in Step 6 with the Sponge 3 starter liquid and flour, mix lightly, and mark the liquid level with a rubber band.
- Leave in a warm place for 8 to 12 hours to ferment.
- When the sponge has doubled in volume and there are air bubbles in the bottom, it's done. Rest for 12 hours in the refrigerator.
- Use the completed starter sponge to make delicious bread or waffles.
- Use up the starter sponge within 2 weeks. If the sponge loses its oomph, use in pizza dough or waffle batter.
Also known as a sourdough culture, a sourdough starter is a simple mixture of flour and water which acts as a natural leavening agent. Wild yeast is present in all flour and a starter is a way of cultivating it in a form that can be used to bake with. A healthy sourdough starter means great bread. Despite all the mysticism and lore about creating the concoction, when broken down, this sourdough starter recipe it's merely a naturally fermenting mixture of flour and water. Add water to dry flour and let it sit on the counter for a few days, and you'll see nature weave life into a once lifeless lump: bubbles will appear, and the mixture.
If you find this Bread (Sourdough) Starter recipe useful please share it to your close friends or family, thank you and good luck.