Hey everyone, welcome to my recipe page, looking for the perfect Homemade Miso Using a Pressure Cooker recipe? look no further! We provide you only the best Homemade Miso Using a Pressure Cooker recipe here. We also have wide variety of recipes to try.
Before you jump to Homemade Miso Using a Pressure Cooker recipe, you may want to read this short interesting healthy tips about {Easy Ways to Get Healthy. Becoming A Healthy Eater
Camp cooking can be as complicated or simple as you want it to be. If you wish to prepare fast and easy but nutritious meals as you’re camping, camp cooking does not even need to need a fire. But if you’re considering fueling your camping trip with a feast, camp cooking can enable you to make warm, healthy foods which are as great as you can make them at home in your own kitchen.
Camp cooking doesn’t need to be limited to sandwiches and baked potatoes wrapped in aluminum foil. Almost any cooking process you are using in the kitchen can be duplicated around the home. For instance, use a toaster or pit cooking to consume your meals. You might also easily fry foods at a bowl over a grill, or boil, braise and beverage. What kind of camping cookware is ideal for you? Camp cooking and cleanup may be easy or a hassle, it all starts with great camping gear.
Some pots/pans arrive in places that partner jointly or"nest" for storage and also allow you to tuck a spoonful of fuel inside them. This comes in handy once you’re seeking to save space while camping.
Listed below are some camping things to consider with you if you’re planning on preparing some meals around the campfire. These common kitchen items allow you to replicate yummy meals when you’re out of doors.
• Other of your favourite herbs and spices • Cooking oil • Pot holder
• Aluminum foil
• Cutting knives • Cutting board • Mixing bowl
When you have just a couple of campers and are searching for some easy camp cooking, try out the simple and speedy technique of tin can cooking. All you will need is a fresh tin can – a 1 gallon size can works well. Your source of heat may be little campfire, or when wood burning is prohibited, a little buddy burner may work nicely, which can be seen at sporting good stores or online. Place your meal from the tin can and easily warm the contents of your can over a flame. You’ll have a hot meal ready in minutes. This technique works great for soups, beans and poultry.
A more time-consuming camp cooking technique which also produces delectable meals is pit cooking. Pit cooking is terrific for items that may be wrapped in aluminum foil to be cooked. It’s also a wonderful camp cooking method if you’re using a dutch oven or cast iron cookware. Pit cooking warms your meals by heating rocks and coals that are buried in the ground. As the rocks cool off, their emitted heat cooks the meals. To pit cookfirst dig a hole that is about three times larger than your own cookware. Line the pit with rocks and create a fire in the middle. When the flame has burned rapidly for approximately an hourpush the warm coals and stones into the center. Layer your wrapped meals or covered skillets in addition to the stones and coals and put more on top. Following a couple of hours, you’ll have some delicious camp food to relish.
We hope you got benefit from reading it, now let’s go back to homemade miso using a pressure cooker recipe. You can have homemade miso using a pressure cooker using 3 ingredients and 22 steps. Here is how you cook it.
The ingredients needed to prepare Homemade Miso Using a Pressure Cooker:
- Get 2 3/5 kg Fresh rice malt (nama koji)
- Provide 1 3/5 kg Soy beans
- Get 800 grams Salt
Instructions to make Homemade Miso Using a Pressure Cooker:
- Rinse the soy beans, and soak them in plenty of water overnight. They will swell up to twice their size by the next day.
- Put the soy beans into twice their volume of water in a pressure cooker and bring to a boil. Skim off the white scum that rises to the surface.
- Put the perforated metal plate that comes with the pressure cooker on top. Lock the lid on and cook under pressure for 10 minutes, then leave to cool down naturally. *If you have a small pressure cooker, cook the soy beans in 2 batches.
- This is the fresh rice koji I ordered by mail and used this time. There are 2 bags containing 1.3 kg each. You can use dried rice koji instead!
- While the soy beans are cooking, mix the koji and salt together.
- Drain the cooking liquid from the cooked soy beans, and hold onto it to use later. *If you're cooking the soy beans in several batches, just keep the cooking liquid from the final batch.
- Let the soy beans cool a bit, and put them in a plastic bag. They'll be hot so wrap the bag in a towel and press down with your hands to mash them. The beans are very soft so this should be easy.
- Add the combined koji and salt from Step 5 to the mashed soy beans and mix well. Mix in some of the cooking liquid until the paste is about the consistency of hamburger mixture or about as soft as your earlobe.
- Line a large container or tub with a double layer of plastic bags. Roll the paste into apple sized balls (these are called miso balls) and throw them hard into the container. Press them in firmly to eliminate any air pockets.
- When all the miso balls have been put into the container, press down hard on the whole mass again while putting your weight into it to remove any air. Sprinkle a handful of salt on top evenly. (This is to prevent the surface from developing mold.)
- Squeeze the inner plastic bag closed while pushing out any air inside. Press a small lid or plate on top, add a weight on top of that and wrap and close the outer plastic bag over all. Cover with a lid.
- Wrap the whole container with another plastic bag. Leave it in a dark, cool place out of the sun.
- Here's the schedule from this point on:
- Mixing up from the bottom (1st time): Check on the miso after about 2 months to see if it has developed any mold! If it has, just remove the parts with the mold. Mix the whole thing up from the bottom after removing the moldy parts.
- Mixing up from the bottom (2nd time): Open up the miso 4 months after the first time you mixed it up! Mix it up from the bottom again.
- If the miso has matured enough when you mix it up the 2nd time you can start eating it, but it will become more delicious if you let it mature for a while longer.
- I made miso this time on February 3rd, the day of spring (Setsubun no Hi). I'm looking forward to how it will turn out.
- April 30th: The first mixing up! It's about 3 months after I made the miso. I opened the lid slowly since I was afraid it had developed mold.
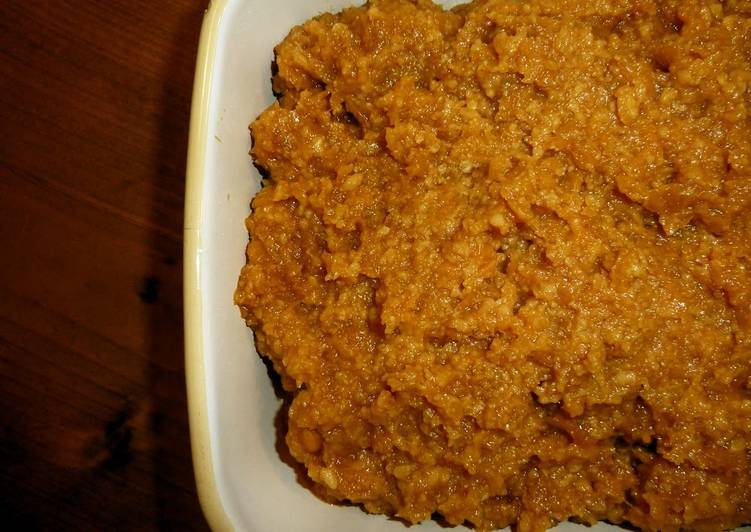
- Looks so good! It's fluffy, and actually starting to smell like miso! It hadn't molded at all as I'd feared, and it's turned into miso. It's not yet edible at this point, though.
- I mixed it up from the bottom. To do this I took the plastic bag out and squeezed the miso over the bag. This way my hands are not in direct contact with the miso, so no bacteria gets into it.
- I returned the plastic bag to the container, and levelled out the surface with a wooden spatula. I closed up the plastic bags again as described above. I left it in a cool, dark place. I'll check on it again in September…maybe it will be ready to eat by then…
- End of August: It's matured into a delicious looking miso. It's ready to eat at this point. The top photo is of the miso at this stage.
Nowadays, you can even bake in your pressure cooker! Many people who are using electric pressure cookers like Instant Pot Pressure Cooker are even making cheesecakes and homemade yogurt. So really, the possibilities on how to use a pressure cooker are endless! In a large heatproof bowl, combine leek, onion, carrot, garlic, and ginger. A while ago, My hubby did a ramen cooking class with this miso ramen recipe.
If you find this Homemade Miso Using a Pressure Cooker recipe valuable please share it to your close friends or family, thank you and good luck.